🔥 Website for Sale - Contact Us

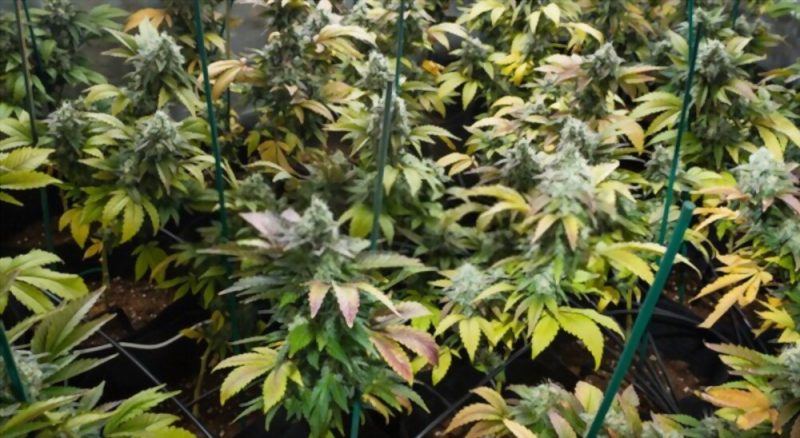
Leaves that turn yellow during flowering can be a sign of bad times ahead. However, sometimes it’s simply a harmless natural response of the plant getting ready for harvest. While Cannabis leaves turning yellow during flowering is not always a cause for concern, it is extremely helpful to understand when your ladies are attempting to communicate with you about their health and well-being.
First, we need to determine if the leaves are turning color because of stress or if they are past the point of saving. However, Droopy-looking leaves can simply mean the leaves are dead and do not contribute to supporting the plant. A good rule of thumb when it comes to dead yellow fan leaves is to remove them as soon as possible to help the plant manage its growth energy and not waste it on limbs that will inevitably die.
Once you establish that the fan leaves are not dead or starting to decompose, we need to dig deeper to diagnose the root cause of the leaves turning yellow. Today we are looking at all the possible reasons why cannabis leaves turn yellow and the most effective treatments to nurse your ladies back to tip-top health.
How to Diagnosis cannabis leaves turning yellow?
Chlorosis is the yellowing of leaves because of a lack of chlorophyll and can be easily identified by examining the leaves. The absence of chlorophyll can be recognized when leaves turn yellow but the veins remain dark contrasting green.
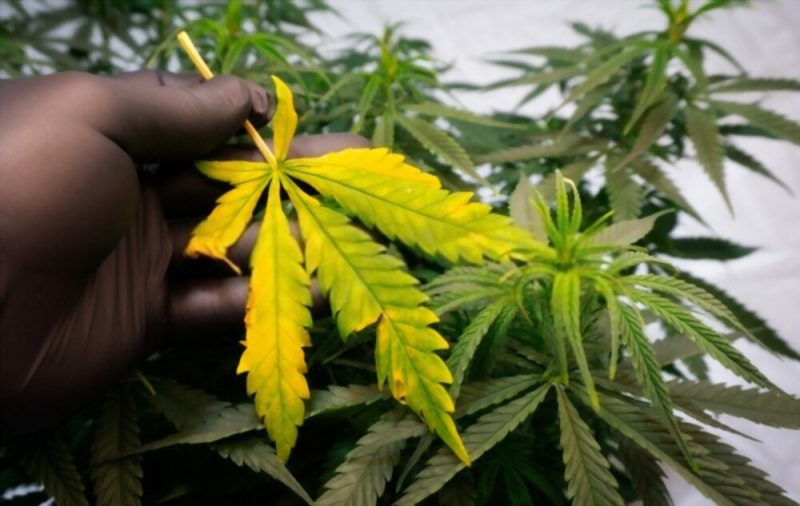
Although there are many things that can cause Chlorosis, the most common reasons are environmental, sunlight, and supplement deficiency. However, leaves turning yellow during flowering are typically caused by “senescence”, a natural biological aging process of plants. While senescence is nothing to be concerned about it does naturally spark concern with new cannabis cultivators because of the dramatic appearance change of the plants. Senescence can be compared to what plants experience during Autom season when leaves turn yellow with the swing of the season.
When cannabis plants reach the final five weeks of flowering their fan leaves typically turn yellow because of nutrient reallocation within the plants. Once cannabis reaches the late flowering stage the plant redirects all the available nutrients to flower development which slightly starve the leaves from supplements and minerals. This process is completely expected before harvesting and also serves as a signal to the grower how far along the plant is in the flowering stage.
When fan leaves change color during late flowering growers typically start the flushing process. “Flushing” is a common practice where growers flush their plants with clean water with zero nutrients or supplements with the aim to increase the quality of the flower yields.
Allowing clean water to flush throughout the plant’s internal vein system removes any toxins and nutrient build-up from pesticides and supplements. The harvest flower quality drastically increases with this process and is notable when smoking the flower.
Apart from getting a more enjoyable smoking experience, flushing your plants during the late flowering stage also speeds up the senescence process. Often the cause of chlorosis is a symptom of a weak photosynthesis process. Although this is a serious problem, diagnosing the problem early allows the grower to treat the deficiency symptoms before the plant sustains irreparable damage.
Let’s explore all possible reasons why your ladies are struggling with photosynthesis and what can be done to treat the symptoms.
1. Giving your plant too much water
Overwatering typically refers to the plant absorbing more water than it is able to transpire back into the air.
While too much water is harmless when exposed for short period, it can cause the nutrient deficiency process to accelerate. Too much water consistently can drastically alter the atmospheric composition in your grow tent which negatively impacts plant growth.
Another possible can get overwatered is caused by poor soils with have insufficient drainage capabilities.
While the symptoms can closely resemble nutrient deficiency because of appearance, there are signs to look out for that can verify overwatering as the problem.
Fan leaves that look droopy and swollen are the best indicators of overwatering. This is also true when trying to establish if you are giving your plants too much water at any given time. If your plant leaves start to droop immediately after watering, this is a sure sign the plant is too saturated with water.
Solution: How to treat overwatering symptoms
Treating overwatering is pretty straightforward, simply water your plants less. Watering your plants might seem like an easy thing but in reality, it can be a bit more strategic than you might think.
A good way to estimate when your plant is ready for a drink of water is to stop all watering until the plant leaves begin drooping slightly because of dehydration. While this might seem counterproductive, it is actually good for the plants to run for short periods low on moisture.
Another reason that might cause overwatering is poor soil drainage that might let you think the plant needs more water because the overflow water tray is empty.
To prevent drainage problems, never use random soil from outside. Apart from poor drainage, outside soil can also cause all sorts of health issues to your plants.
Random garden soil can be contaminated with pests and diseases that can be lethal. While not all outside soil is dangerous, it is better to take precautions by using propers pot soils sold from a legit garden center.
How to estimate the amount of water
Good plants soil allows about 10-20% of the water to drain through to the overflow tray. Once you eliminate poor soil quality, water the plant slowly until the drainage tray is 15% full.
Once 15% of the water drain into the overflow tray the soil is 100% saturated. Remove the excess water from the overflow trays and retain for watering until the plant leaves start is droop sightly from dehydration. This signals that the plants are ready for another drink of water.
How often should you water cannabis plants?
If you don’t want to restrict water from the plants until the leaves begin to droop, the next best method is to stick a finger into the soil to about a knuckle deep. If the soil feels dry it is time to give your ladies a drink of water.
2. Stress from high temperatures
Cannabis plants are comfortable in relatively high temperatures and humidity, but too much can cause the plant leaves to curl up and turn yellow. While there are multiple reasons for a grow room to become too humid, the biggest perpetrators are a lack of plant maintenance and over-watering.
Ideally, you want to make sure that the grow room temperature stays between 60° F and 85° F. Keep in mind that while the temperature needs to stay within this range, each growth stage requires a different temperature. While nighttime temperature slightly drops because of the absence of heat from light bulbs, it should never sink below 60° F or rise above 85°.
Solution: How to control temperature and humidity
Temperature and humidity are directly related and dependent on each other. There are many quick actions you can take to help control temperature and humidity that cost zero dollars. Although these techniques are effective, they work best in tandem with other best practices.
First, quick action: The quickest way to take control of the humidity in a grow tent is by mastering plant defoliation techniques. Trimming lower branches that the plants do not use for photosynthesis or flower development will lower the production of carbon dioxide during nighttime once photogenesis stops. Much like the earth’s atmosphere, too much carbon dioxide creates a chain reaction and results in rising temperatures.
Second quick action: Another contributor that can make temperature difficult to control in a grow tent is the type of light source used. Certain Light bulbs radiate heat that will result in rising humidity. Lowering tent atmospheric temperature reduces humidity which exerts less stress on the plant’s interal cooling system. Plants regulate their internal temperature much like humans.
Plants lower interal temperature by absorbing water at a faster than usual rate then releasing it back into the atmosphere. Since plants sweat out 95% of absorbed water, grow room atmosphere can quickly get saturated with moisture and create all sorts of problems that can make the fan leaves turn yellow.
Third quick action: To make this technique effective the plant density should be reduced prior. Grooming your ladies regularly results in ventilation fans and climate control equipment working less to take control over climate temperature and humidity. Reducing plant density allows airflow to freely move throughout the entire grow tent to lower atmospheric moisture.
Fourth quick action: Temperature and humidity can be easily controlleded by following simple best practices. While these methods are effective in small grow spaces, a larger area may need an extra boost with the help of a humidifier or dehumidifier. Climate moisture equipment is by far the most effective way to deal with humidity in a grow room but it does come with a price tag.
3. Pest and Insects
Pests and insects are the most destructive reasons why fan leaves turn yellow. If left untreated, the plague will infect all plants in close proximity and eventually destroy the entire crop.
Pest and Insects attack is similar to relentless mosquito attack when hanging out on a humid day close to the swap or tropic juggle. While these insects might be small, their sheer numbers will bring any target down to their knees eventually.
Solution: How to get rid of Pest and Insects
Pests like fungus gnats are typically a result of either overwatering or stagnating pools of open water in grow room. Firstly, clean up the grow room of any water spoilage or overflow water that might be in the pot gathering trays. While this will not entirely stop a pest invasion, it reduces the risk and buys you critical time to take action before the investigation become out of control.
While getting rid of plant insects is not easy, there are some good natural remedies that are worth exploring before using harmful pesticides. Depending on the type of pests, natural pesticides like diatomaceous earth and neem oil are a good place to start from but are not always the ideal solution. Because of the variety of potential pest invasions, there is no one size fits all solution. To effectively treat a plague, first identify the pest to find the appropriate natural remedy.
If you are unable to find a natural remedy and forced to use harmful chemicals, flush your plants with clean water during the final weeks of flowering to remove toxin buildup.
Nutrient Imbalance
Nutrient deficiency is by far the most common cause why fan leaves turn yellow. Luckily, nutrient-related problems are a quick and easy fix, but it does require knowledge to identify the deficiency. If you are unable to identify the deficiency on your own, One possible option is to send a soil sample to the closest garden center for analysis.
While diagnosing nutrient deficiency might sound complex, it can be identified easily by comparing the yellowing symptoms to this easy guide below. We’ll cover all the most common nutrient deficiencies and what to do about them.
Nitrogen
Nitrogen is the most common nutrient deficiency for yellowing leaves because it is directly responsible for chlorophyll production. Typically, older leaves located at the bottom of the plant will start yellowing first and then work their way throughout the entire plant.
Given enough time these yellow leaves will naturally separate from the plant but can also be manually removed to free resources for the healthier leaves.
Potassium
A lack of potassium starts by curling leaves and forming notable brown spots that eventually turn the entire leave yellow.
Magnesium
Magnesium is another vital nutrient that helps in the production of chlorophyll. Magnesium deficiency causes the fan to leave to curl and blood veins to turn slightly yellow. While it is easily treated, diagnosing magnesium deficiency can be a bit more tricky because the symptoms only appear approximately 4 weeks after the deficiency started.