🔥 Website for Sale - Contact Us

In this beginner’s guide, we’ll explore the ins and outs of setting up a grow tent. We’ll cover everything from choosing the right equipment to understanding the best lighting and ventilation systems. By the end of this guide, you’ll be well on your way to producing your own top-shelf cannabis.
II. Choosing the Right Grow Tent
A. Factors to consider when selecting a grow tent
Size and available space: Just like Goldilocks, you want to find a grow tent that’s not too big, not too small, but just right. Do you have room to dedicate to your new hobby?
Durability and quality: Picture this: you’ve spent countless hours tending to your cannabis plants, only for your grow tent to collapse under the weight of your hard-earned harvest. Sounds like a nightmare, right? A high-quality tent is a great investment because that can withstand the test of time (and the weight of your plants). You might save a few bucks on a flimsy tent, but will it be worth it when your cannabis dreams come crashing down?
Accessibility and ease of use: Unless you’re a professional contortionist, you probably don’t want to crawl on your hands and knees to tend to your plants. Look for a grow tent with easy access, such as doors or zippers, so you can care for your cannabis without turning into a human pretzel.
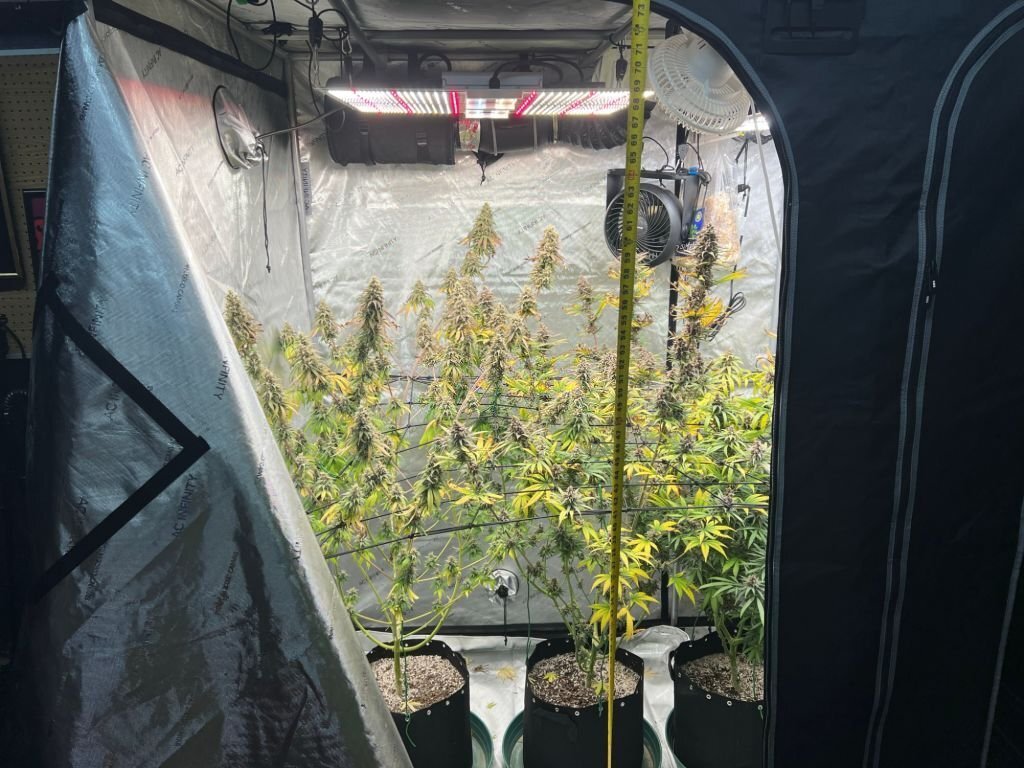
III. Essential Components for Your Grow Tent
A. Lighting options
LED lights: Imagine your grow tent as a tropical beach, basking in the warm glow of the sun. LED lights are the sun of your cannabis beach paradise. These energy-efficient, long-lasting lights provide the full spectrum of light your plants need to grow big and strong, without breaking the bank or turning your grow tent into a sauna.
HID lights: If LED lights are the sun, then HID (High-Intensity Discharge) lights are the high-powered tanning bed of the cannabis world. While they may be less energy-efficient than their LED counterparts, HID lights pack a punch.
Fluorescent lights: For those who prefer a more gentle approach to cannabis cultivation, fluorescent lights offer a cooler, more energy-efficient alternative to HID lights. Just be prepared to invest in a few extra bulbs, and tend to cover a smaller area.
B. Ventilation and air circulation
Inline fans: Think of inline fans as the personal trainers of your cannabis garden, encouraging your plants to breathe deep and work up a sweat (or, more accurately, transpire). These fans pull fresh air into your grow tent and expel stale air, ensuring your plants receive the oxygen and carbon dioxide they need to flourish.
Oscillating fans: The unsung heroes of the grow tent world, oscillating fans help prevent mold and mildew by keeping air circulated throughout your cannabis garden. Plus, they give your plants a gentle rustle, mimicking the breeze of their natural habitat and encouraging strong stem growth.
Carbon filters: No one wants their home to smell like a cannabis farm (well, most people, anyway). Carbon filters help remove odors, and airborne contaminants from your grow tent’s exhaust air, keeping your cannabis cultivation a discreet and pleasant-smelling endeavor.
C. Temperature and humidity control
Thermometers and hygrometers: Just as you wouldn’t want to be too hot or too cold, your cannabis plants have their own preferences to temperature and humidity.
Heaters and air conditioners: With cannabis tent temperature control, a simple fan just won’t cut it. Invest in a heater or air conditioner to keep your cannabis plants comfortable during temperature fluctuations.
Humidifiers and dehumidifiers: The final piece of the grow tent puzzle, humidifiers and dehumidifiers help you maintain the ideal humidity levels for your cannabis plants, warding off mold and mildew and promoting healthy, happy growth.
With these essential components, your grow tent will be transformed from an empty shell to a bustling cannabis metropolis.
IV. Setting Up the Grow Tent
You’ve gathered all the pieces to your cannabis cultivation puzzle, and now it’s time for the main event: setting up your grow tent.
A. Installing essential components
Hanging the lights: Now it’s time to bring in the big guns – your grow lights. Hang them from the provided supports or adjustable hangers, making sure they’re at the correct height for your cannabis plants. Remember, different lights have different ideal hanging heights, so consult the manufacturer’s recommendations.
Setting up ventilation and air circulation: Install your inline fan and carbon filter, connecting them with ducting to create a streamlined airflow system. Don’t forget to add oscillating fans to keep the air circulating within the tent, giving your plants a gentle breeze to help them grow strong and healthy.
Placing temperature and humidity control devices: Position your thermometers, hygrometers, heaters, air conditioners, humidifiers, and dehumidifiers strategically throughout your grow tent, ensuring accurate climate monitoring and control. Your cannabis plants will feel like they’re vacationing in a five-star resort!
B. Organizing the grow tent for easy access and maintenance
Arrange your plants: As you introduce your cannabis plants to their new home, consider their spacing and organization. Give them enough room to grow, and place them to allow for easy access and maintenance.
Manage cables and hoses: Keep your grow tent tidy and safe by organizing and securing any cables, hoses, or other loose items. Use zip ties, Velcro straps, or cable organizers to keep everything neat and out of the way.
Create a maintenance routine: To ensure your cannabis plants remain happy and healthy, establish a routine care take routine. Regularly monitor temperature, humidity, and airflow, and adjust as needed. Ensure the plants receive the proper nutrients, water, and care they deserve.
V. Choosing the Right Cannabis Strain
With so many strains to choose from, how can you possibly decide?
A. Factors to consider when selecting a cannabis strain
Growing difficulty: Like choosing between a waltz and a tango, some cannabis strains are easier to grow than others. As a beginner, it’s wise to select strains known for their hardiness and resistance to common issues like pests or mold. Save the more finicky strains for when you’ve got a few successful harvests under your belt.
Flowering time: Just as some dances take longer to master, different cannabis strains have varying flowering times. If you’re eager to see the fruits of your labor sooner rather than later, opt for strains with shorter flowering periods.
B. Recommended cannabis strains for beginners
Now that you know what to look for in a cannabis strain, allow us to present a few beginner-friendly options to consider:
Blue Dream: A classic strain beloved by cultivators and consumers alike, Blue Dream offers a balanced mix of Sativa and Indica. With its forgiving nature and generous yields, it’s an excellent choice for those new to cannabis cultivation.
Northern Lights: A true indica powerhouse, Northern Lights is known for its resilience and relatively short flowering time. This strain is perfect for beginners seeking a low-maintenance plant with a heavy, relaxing effect.
White Widow: White Widow is a robust and high-yielding strain that offers a powerful, euphoric high. With its resistance to mold and pests, this strain is a fantastic option for novice growers.
Auto-flowering strains: For those looking for a more hands-off approach, auto-flowering strains, such as Auto Blueberry or Auto AK-47, require less attention and have a shorter life cycle.
VI. Basic Cannabis Cultivation Tips
A. Starting from seeds or clones
Seeds: If you’re starting your cannabis journey from seeds, choose high-quality, reputable seeds from a reliable source. Germinate your seeds using the paper towel method or by planting them directly in a seedling starter mix. Keep them moist, warm, and well-lit until they sprout and develop their first set of leaves.
Clones: Clones are plant cuttings from a mature, healthy cannabis plant. They offer the advantage of being genetically identical to the mother plant, ensuring consistent characteristics and growth patterns. If you start with clones, ensure they are free of pests and diseases before introducing them to your grow tent.
C. Watering and nutrients
Watering: Overwatering and underwatering are common mistakes among novice cannabis growers. Find the sweet spot by allowing the top inch of soil to dry out between waterings. When in doubt, it’s better to underwater than to overwater, as cannabis plants can recover easily from a drought.
Nutrients: Cannabis plants require a balance of macronutrients (nitrogen, phosphorus, potassium, calcium, magnesium, iron, and more) to thrive. Choose a high-quality nutrient mix formulated for cannabis, and follow the manufacturer’s instructions for feeding schedules and dosages. Adjust as needed based on your plants’ response.
D. Pest and disease control
Prevention: An ounce of prevention is worth a pound of cure. Maintain a clean grow tent, sanitize your tools, and monitor your plants regularly for signs of pests or diseases. Address any issues as soon as they arise to prevent them from spreading.
Treatment: If you do encounter pests or diseases in your grow tent, choose organic, non-toxic treatments whenever possible. Neem oil, diatomaceous earth, and insecticidal soap are all effective options for combating common cannabis pests, while baking soda and milk can help treat fungal diseases.
A. Knowing when to harvest
Pistil method: One way to determine if your cannabis is ready for harvest is by observing the color and appearance of the pistils (the hair-like structures on the buds). When approximately 60-70% of the pistils have darkened and curled inwards, your plants are likely ready for harvest.
Trichome method: For a more precise approach, use a jeweler’s loupe or a microscope to examine the trichomes (tiny, crystal-like structures) on your buds. When most trichomes have transitioned from clear to cloudy or amber, it’s time to harvest your cannabis plants.
B. Harvesting your cannabis
Prepare your tools: Gather a pair of sharp, clean pruning shears, gloves, and trays or containers to hold your harvested buds. Sanitize your tools and workspace to prevent contamination.
Cut and trim: Begin by cutting the larger branches from the main stem, followed by smaller branches. Carefully trim away any excess leaves surrounding the buds, leaving only the resin-rich flowers.
C. Drying your cannabis
Hang and dry: Hang your trimmed branches upside down in a dark, well-ventilated space with a temperature of around 60-70°F (15-21°C) and a humidity level of 45-55%. Keep air circulating gently around the buds to prevent mold growth. Check for dryness: After 7-14 days, your buds should be dry to the touch and the smaller branches should snap when bent. If they’re still flexible, continue drying until the desired level of dryness is achieved.
D. Curing your cannabis
Prepare for curing: Once your buds are adequately dry, gently remove them from the branches and place them in airtight glass jars. Fill the jars about ¾ full to allow for air circulation.
Monitor humidity: Use a small hygrometer to check the humidity inside the jars. Aim for a humidity level of around 60-65%. If the humidity is too high, open the jars for a few hours to release excess moisture. If it’s too low, add a humidity pack to the jar to raise the humidity level.
Burp the jars: During the first two weeks of curing, open the jars for 15-20 minutes each day to allow fresh air in and release any built-up gases. This process, known as “burping,” helps to preserve the flavor and potency of buds.
Patience is key: Ideally, you should cure your cannabis for at least 4-6 weeks, but the longer you wait, the better the flavor and aroma will become. Some connoisseurs cure their buds for several months to achieve the ultimate cannabis experience.